You might remember that I posted about my
favourite pincushion a while back. This large pincushion is a workhorse: fantastic when machine stitching long seams, removing the pins as I go, as I can blindly stab the pins in the general direction of its commodious surface and they hit home. It also can accommodate the large number of pins and variety of needles I use in various projects. I decided to try to re-create it, using some fabrics printed with sewing motifs and do a tutorial of my process. Here goes:
Collect seven tomato paste tins. For me, this step took the longest since I rarely use tomato paste. Of course, any small tin will do, but they need to all be the same size. Since the fabric I intended to use was fairly thin, I covered the tins with scraps of cotton quilt batting, cut to size with a small overlap, and glued on.
These were my fabrics, from the stash. I cut them to measure the circumference of the tin plus a 1/2" overlap, and the height of the tin plus two inches.
Before gluing, I ran a line of machine gathering along the top and bottom of each piece. Since I didn't want glue marks to show on the surface I just glued the overlap. Then I pulled up the gathering threads to snugly fit the tin, and tied them off.
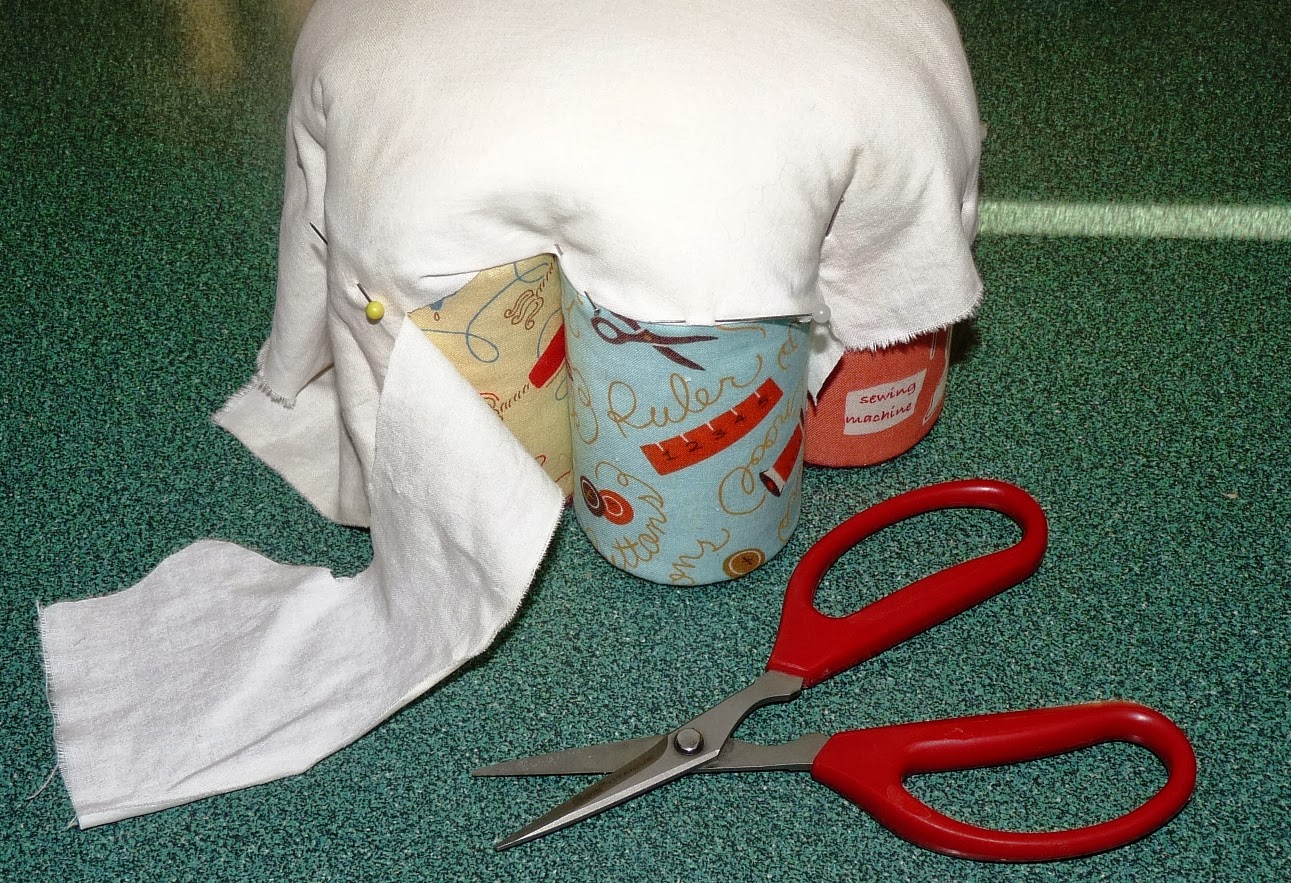
Just six need to be covered with the fabric, since the centre one doesn't show.
I grouped the tins snugly together after running a line of glue along each seam and where they touch. Careful, not too much glue is needed. The seams face in towards the centre tin. Also, I aligned the tins so the open ends were all facing in the same direction. On the original, the open ends faced down, but I don't know that it actually makes a difference. I then wrapped a strip of paper around the bundle and used a couple of rubber bands as clamps until the glue dried.
I traced around the bundle twice onto some thin cardboard retrieved from the recycling bin. I cut both out approximately 1/8th of an inch inside the line. The cardboard is only a reinforcement, and will not show, so it doesn't have to be perfect. I attached these pieces to the top and bottom of the bundle using lots of glue and then weighted it with a book and let it dry overnight.
I then traced and cut out a piece of felt to fit the bottom of the bundle. (The original cushion on on the right.)
And stitched it to the fabric using matching thread and a curved needle.
There was then quite a dilemma deciding what to use for stuffing. I think ideally that cleaned carded wool batting would be the best, but all I had on hand was polyester fibrefill, so I used that, mounding what seemed like an appropriate amount on top of the cans, draping a scrap piece of cotton sheeting over it, and pinning and trimming to fit, adding bits of additional stuffing as needed to create a nice cushy, evenly rounded shape.
Pinned and ready to stitch. The cotton is just an underlayer that holds the stuffing in place so that stitching the "fashion" fabric on the top will go more smoothly.
Once again, I used a curved needle. It sure made getting in to those tight corners easy.
Repeat the process of draping, pinning and stitching with the fashion fabric. Here I used part of an old linen tablecloth.
Here's a closeup of the needle. You can see I just catch a bit of each layer with each stitch.
The final step requires a trim or cord to be applied, covering the edge. If you have a glue gun, go for it. I hand-whipped my homemade cord, and think I could have done a better job. I'll probably take it out and do it again. I made the cord by rummaging through my collection of odd bits of yarn, choosing several strands, and running them through the spinning wheel to add twist, then letting it double back on itself. I only needed about 14" worth, so I could have just as easily done it without the spinning wheel.
Et voila! The finished product! I don't know what the weird golden light behind the pincushion is, but it could well be a reflection of my head on fire.
 |
| Worst photo ever posted in blog-dom. |
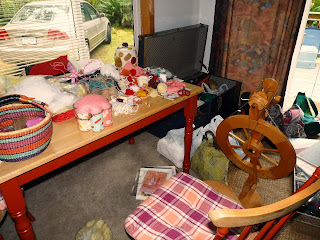
Finally, I strongly recommend that you do as I say, not as I do. This is what my dining room looked like after I was done. Tidying as I
go is not my strong suit. Add to that my simultaneously having to pee and having a hot flash, whilst the dog noisily licks her rear end just to the right of the chair, and you can be very thankful you are viewing this tutorial from the safety of your computer screen.


A reader (otherwise known as James) has suggested that the mental image of my dog licking her rear end might be too much for my gentle readers. What say you? Did I cross the line?
ReplyDeletealas, those of us who frolic with fibre are not the gentle folk James might suggest. I have been known to arm wrestle for a bit of fluff! Like your work and your space- looks just like mine, complete with dog.
ReplyDeleteIn my house it would have been the cat!
ReplyDeleteI was laughing too much at your description to care ;)
loved it all ;)
ReplyDeleteTruly the best pincushion ever. I Googled tin can pincushions to see if anyone else was making similar ones and found lots of single can pincushions, but nothing like this.
ReplyDeleteI, too, loved it all (and related well). Many chuckles! Thank you.
ReplyDelete