The trio of birds I've been working on need a border. I had an idea for one based on feathers, or more specifically, quill pens, which of course are made from feathers, and would have been used by Louis Nicholas to both write his Histoire Naturelle and to illustrate the Codex. I like the connection between nature and civilization that is suggested, this doubling.
 I first turned to my reference books to see if I could find a feather border. Nothing came to light, although the arabesques of classical Greek and Roman design suggested feathers. The book Crewel Embroidery has a couple of Jacobean era curtains with plume motifs, notably Mrs. Lewis F. Day's curtain on the left. (Her husband was an authority on pattern and design in the late Victorian era.)
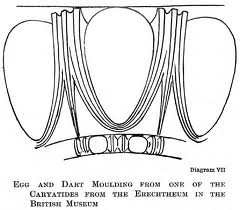
Missing is an earlier sketch I did with feathers only, playing with rectangular and oval borders. When J.P. left a comment on an earlier post, comparing the embroidery hoop to an egg, I knew I should do an oval. Then I went a little farther and thought to combine the feathers and ovoid in the border pattern itself, again playing with the way Greek architecture would use an egg shape in border details.
I then found a thumbnail of a quilting pattern online that had the abstract, feathery look that I wanted. I enlarged it to 400% and actually traced it by hand off my computer screen. (Momentary freak out: Am I violating copyright? )
My tracing, done with a soft felt pen, is in the lower centre of this picture of my work space. (Note the archeological-style strata, some might call it a mess, that I create as I go.) On top of the Scrabble box is a sheet with my little thumbnails of how I might arrange the feathers. I traced the feather shape several times, streamlining it as I went. Then I mirrored it, and added an egg shape in between the pair. The completed motif is on the left. (On the far left is a page from May Morris's teaching notes. She advises not to make lines too "ballooning".)

Now I will use a photocopier to reduce the design to about 25%. It may need a little more simplification at that point, but should be about the size I need to trace repeatedly to form my final, full size border design. Only at that point will I transfer it to cloth, and stitch.
There are a lot of steps in this process, and I draw upon a lot of reference material. This is the method I learned when I was in design school, and is quicker for me than drawing something from scratch. (And I do think I'm safe as far as someone else's copyright goes. I have altered the image substantially, and it is for my own use. I'm not selling it as a pattern.)
P.S. I just thought I should try flipping one of the feather top to bottom. it might make the repeat flow better. It never ends...
P.S. I just thought I should try flipping one of the feather top to bottom. it might make the repeat flow better. It never ends...
A true artist! Thanks for sharing your step-by-step working method. It's fascinating. The egg and feather border is going to look great.
ReplyDelete- it is an education and inspiration to see the process-es that evolve into a finished design. thanks for sharing. can't wait to see the finished work.
ReplyDeleteI never went to art school so the method you describe is new to me. It is a clever way also for someone like me who is not good with a pencil.
ReplyDeleteThe design you came up looks perfect for the three birds embroidery.